Sunday, December 12, 2010

Eco Green Crafts SNEAK PEAK

Hello! I have been LUCKY enough to have been given a some of the NEW Eco Green Crafts products to try out. OMG! I LOVE them! What amazing quality and performance! This company is dedicated to making Eco-Friendly crafting supplies. The average American consumes over one entire 100 ft Douglas Fir Tree worth of paper in a year--imagine how much us scrappers use! One ton of paper uses 24 trees to be made. It is about time a company took notice of the impact and offered us a solution that allows us to continue with our scrappy addictions, while simultaneously decreasing our impact on the environment. Not only does Eco Green Crafts focus on using reclaimed and recycled items whenever possible, they are also committed to making safe, non-toxic products. Even the small amounts of volatile organic compounds (VOCs) are allowed in most crafting product and deemed safe. However, when determining the product's safety, the accumulated exposure over time is not considered and exposure to these toxins over time can have an impact on your health and is especially dangerous for children who are more sensitive to the toxic materials. You can read more about Eco Green Crafts and the reasons they create safe, sustainable products here. NOW ON TO THE ARTISTIC part!

I just started making a mini-album of Christmas pasts. If anyone knows me, they know I HATE (with not just a capital H, but a capital A-T-E too!) to make mini-albums. But when I saw this ADORABLE album from Eco Green Crafts I had to try it again. I did not get very far with my mini-album (still in progress, but hey, I only started last night!), but I did get to use some of the other Eco Green Crafts products while working on it in addition to the Board Book for Dimensional Art. I also used their acrylic paints, Eco-Friendly Dye Based Artists Ink, and The Artistic Traveler Art Stamps "Christmas Classics."

Here is a sneak peak of the Christmas Classics Rubber Cling-Stamp used on the 1st page of my mini-album--I just ADORE this design! (And I do not even celebrate Christmas!) But the stamp is beautiful and meaningful. My picture taking skills are not the best so I might not have done this image the justice it deserved. I stamped it with the Eco Green Crafts Paris Trunk Ink in Stone.


This is the "Board Book for Dimensional Art" from Eco Green Crafts.

All supplies I used here are from Eco Green Crafts!

This is the stamp set I used ("Christmas Classics" by Julie Andrus) and the ink ("Paris Trunk" in Stone).

Close up of supplies used :-)

Thursday, December 2, 2010

My Scrap Room in SLIGHTLY Less Disarray Than Last Month

This is my TRUE CONFESSION blog: I am a disorganized scrap addict! I have more supplies than some small scrapbooking stores, and I am trying to fit them all in the second bedroom in my apartment. It barely holds all of them, SO I need to reorganize and PURGE and find space for everything. I am going to need to buy more organizing stuff (bins and shelves and such) because I have to have a place to put the stuff! AND I NEED to STOP buying scrappy supplies! I spent the last of my Crop Credits, now I am on a fast (with minimal cheating allowed if I find a spectacular deal on Glimmer Mists). So help me gods, I need to clean this room come hell or high water! It is: MISSION IMPOSSIBLE!


 MY GLIMMER MIST Shelf--Top shelf has 72 bottle in this pic + the 6 in the box on the floor--for a grand TOTAL of: 78 2 oz bottles of GM!

 My Ribbon Organizer, Second MM Embellishment Center, and TV Corner--Not too bad ;-)

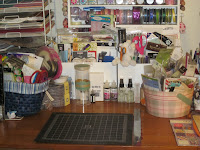
 My MESSY Scrap Table!--Yes there is a table under all that stuff!

Close Ups of the Scrap Table MESS


The Cleanest Corner of my Room, lol!

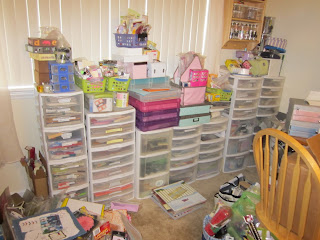
My wall of plastic drawers--all filled with scrap supplies...Addicted? No, not me!

 My "PROBLEM" corner...I NEVER have had this corner cleaned since I reorganized my scrap room in August!

 A bunch of my Basic Grey & Fancy Pants paper--the whole rack that is standing up is BG!

The middle of my scrap room floor--I only have a little path to get to my chair and table and every other inch is covered with scrappy supplies!

My Glimmer Misting Box is even full of STUFF!

It is growing out into the hallway.....


MY BEGINNING OF THE CLEANUP

My Scrap Table


Closeups of the Table

Thursday, October 28, 2010

tag

Daisie from "My Journey Through It All" tagged me!


1. What is your favorite treat? {can be anything you consider a treat} Getting a scrappy supply package in the mail!
2. If you could dress up as anything for Halloween, what would it be? A Cameron Crazie
3. If you had a super power what would you want it to be? Super Understanding
4. Do you like roller coasters? they are OK.
5. What is your favorite hobby? scrapbooking, of course!
6. What is the best compliment you have ever received? A professor wrote in a recommendation for me to go to Duke that I was essentially in the top 5% of students that he had ever known. 
7.  Do you think pets should wear clothes? Only when I dress my puppy up!
8. Long hair or short....which do you prefer? On me, long....my girlfriends, either.


Now I have to tag people and ask them 8 questions. CHECK OUT THESE LADIES BLOG'S! THEY ARE FULL OF INSPIRATION!!!
3. Julie @ {Daily Anecdotes}
4. Jasmine @ WildFlower
5. Dee Dee @ Umwowstudio

Here are the questions:
1. Do you use a paper planner (like FranklinCovey), paper calendar (like a desk or wall calendar), digital planner (like a cell phone, palm pilot, smart phone), digi calendar (like Google Calendar, iCal), or nothing to plan your day & track appointments?

2. What was the name of the last school you attended? (can be high school, college, university, med school, etc.)

3. Do you like the TV show BONES (new episodes air on FOX, older on TNT)?

4. You see a 55 yr old woman and a 24 year old young lady walk into a restaurant--what is their relationship?

5. What languages do you know (speak, read, or write)?

6. Do you recycle faithfully?

7. If I said the word "Ugaritic" what would you tell me it means?

8. Where do you spend the most money on a regular basis for scrappy supplies?

Wednesday, October 27, 2010

1st Online Crop at CropChocolate.com

What could be better than spending a weekend creating with a group of friends plus chances to win awesome prizes? We can't think of anything better than that, so CropChocolate.com will be hosting its first ever 48 hour Online Crop on Saturday and Sunday, November 6th and 7th, 2010! Here are some details:

WHO: This crop is for everyone--CropChocolate.com addicts, errr...I mean, regulars, the newly introduced, or those who have never even heard of the site until now. All you need to participate in the Online Crop and to be eligible for the prizes is to have an active CC account with a valid e-mail address.

WHAT: An Online Crop--It will be part shopping, part crafting, part challenges, and completely fun! We will be doing virtually what you would do at a physical crop...Getting together, since we cannot be in the same place, at least at the same time, to socialize and participate in some challenges, win some prizes, complete some projects (layouts, cards, altered items--you know finally use up some of those beautiful CC goodies you have been hoarding), and have some fun!

WHERE: On www.cropchocolate.com, of course! Spread the word! The main challenges will be featured on the main page of the site throughout the day on Saturday and Sunday in between some SWEET deals on the "treat" page! Worried that you missed a challenge? Don't be! All you have to do is look under the "past deals" section of the website to see the previous challenges. There will also be some fun mini-games and activities going on under the Sweet Talk section of the website throughout the weekend, so make sure to stop by Sweet Talk and check them out too.

WHEN: The BIG dates to mark off on your calendar are Sat. & Sun., November 6-7, 2010! Can't make it for the whole weekend? No worries! The main challenges will be posted beginning on Saturday November 6th at 10:00 AM on the main page and it will alternate a challenge, then a SWEET deal, then another challenge, etc. If you miss a challenge on the main page they are always accessible under the "past deals" section of the website. The deadline for the submission of projects to be considered for prizes for the challenges is MONDAY, NOVEMBER 8th, 2010 11:59 PM MST (CC time) unless an earlier deadline is stated. That is approximately 24 hours after the crop ends. The challenges will be posted between 10:00 AM and 10:00 PM on Saturday Nov 6th and 10:00 AM and 6:00 PM on Sunday Nov 7th.

WHY? Because we are sooo SWEET on YOU! CropChocolate.com has a strong and vibrant community and we want to share that community with more of our current and potential customers. We think YOU are what makes CropChocolate.com unique, and we like that.

Sweetly,

Megan Ann

Friday, October 22, 2010

Altered Vintage Findings Tin by Making Memories

I was issued a challenge on another scrappy blog to alter a tin and include a butterfly on it. I was also to include a before picture of the tin. It was the AWESOME blog run by my friend val, Scrap, Love, Laugh! which can be found at www.scraplovelaugh.blogspot.com. Check out their blog for monthly challenges with GREAT prizes and some awesome inspiration!!!

So, here is the before picture of my tin:

I did a SIMPLE, SIMPLE altered tin. I might do another nicer one later, but I was just looking to kill about ten minutes as a reward for finishing writing a page of my paper, so I needed a simple project! 

Supplies Used (CC=available at cropchocolate.com): 
Vintage Findings Tin by Making Memories (CC)
Gold Outline Stickers by Sakura 
Roll of Adhesive Bling Circles by Recollections
Adhesive Bling Shape Strips by Recollections
Gold Adhesive Glitter Chipboard Alphabet Stickers by Recollections
Vinyl Sticker Paper by Slice (CC) part of the Multi-pack by Slice
Glossy Accents by Ranger


First, I covered the bottom of the tin with Vinyl Sticker Paper by Slice which is self-adhesive. I cut a rectangle a little larger than the size of the tin. Applied the vinyl to the tin and folded the edges up and squished in the corners. Then I trimmed off the excess so the tin would easily close. I left the top of the tin in its original condition.


I knew I needed to add the butterfly so I found a beautiful delicate Gold Butterfly Outline Sticker by Sakura that I wanted to use on it and since gold and silver are both metallics and ALL metallics are neutrals, they went together perfectly! I added some Glossy Accents to highlight parts of the butterfly's wings. Then I found these cool Gold Chipboard Alpha Stickers by Recollections, so I added an 'M' for Megan (of course!). The Gold Alphas already had the 3 rhinestones on them, so I decided to add a few of the rhinestone circle accents to the tin, but then there were empty spaces that were too small for the rhinestone circle accents, but needed something to fill them in, so I added the rhinestone shapes to the tin lid. And,  Viola!

Wednesday, September 15, 2010

Glimmer Mist Foil Technique for making Custom Paper!


SUPPLIES NEEDED: about 5 sheets of heavier paper (I used American Crafts 12x12 White Textured Cardstock,60 count pack,  80 lbs);  2, 3, or more Complementary Colors of glitter mists. I suggest using 3 and one lighter color, one medium intensity color, and one darker color. You can use more colors or fewer colors. The last set of papers I did , I only used 2 colors. I used Tattered Angels Glimmer Mists in the following combinations: for 1st set of papers: Pashmina (lighter), Frozen Lake (medium), and Cranberry Zing "Mist-Fits" (darker)....for the 2nd set of papers: Hula Hoop (light), Waterslide (Med.), and Tutti Fruitti (darker)..for the 3rd set I used Waterslide and Tutti Fruitti. You also need Aluminum Foil (any brand). You need either a box that is approx. 14x14 square bottom and about 10 inches high....tape the flaps so they are standing up on 3 out of 4 sides which will make 3 out of 4 of the sides approx. 18-20 inches height or a VERY large space covered with newspaper or craft paper to protect surface or do it outside. You need to wear disposable latex or latex-free gloves or have paper towels handy to wipe up drips if they happen and to wipe your hands off it you do not want to wear gloves--it can get messy! A large piece of craft paper or newspapers to set the papers on to dry once you have done the technique. I did this in my living room and the 1st time I did it the Glimmer Mist soaked through to the carpet! ((oops))


STEP 1: Tear off a piece of aluminum foil that is approx 2 1/2 to 3 ft long to make a 12x12 piece of paper. (Precision is not important here in the length of the foil, so just estimate.) Begin by laying the foil down on a surface such as a table or the floor and scrunch it up. Just put your hand down on the foil and make a fist, taking the foil into your fist. You may be wondering why not just crumple it into a ball? Well, you can, but it is harder to flatten out without ripping and it is more time consuming.Continue the crumpling until the entire sheet of foil is crumpled.


STEP 2: Begin to flatten out the crumpled aluminum foil. It should not be completely flat (do not go getting your iron out or anything!) you need some of the wrinkles to produce the effect. It should look like the photo below when you are finished slightly flattening it out.


STEP 3: Tear the long piece of aluminum foil that you just crumpled and then flattened a bit in half.  So you have 2 sheets of aluminum foil that are crumpled and about 12x10 inches each.


STEP 4: Place the 2 sheets of aluminum foil in your box (or on your protected area) slightly overlapping so they cover a surface of AT LEAST 12 inches by 12 inches! This is important so your entire paper will get the effect from the foil. If you are using a smaller piece of paper, you can use a smaller piece of foil. But this tutorial is for making a 12x12 background paper. 


STEP 5: Time to add the glitter mist! I am using Tattered Angels Glimmer Mist, but you could also use Smooch Spritz or Maya Mists or make your own glitter mist. Using your lightest color of glitter mist, mist several concentrated spots onto the foil. Take second (medium) color glitter mist and mist in concentrated places on the foil, you can keep the colors separate or allow them to bleed together. Make sure to saturate the foil, almost forming pools of liquid on the foil. Add the third color to the foil in concentrated places. Repeat however many times necessary until you have applied all of the colors that you would like to apply.


STEP 6:


2 Color Glimmer Mist Foil Background!


MY 1st Time *TRYING* to Make GlimmerMist Paper


1st Attempt Saturated with Glimmer Mist